🦆 Quackify Your Terminal With 13 Lines Of Code
Make your day better with command line duck images!


You can take a look at the final code and a summarized version of this article here.
Why?
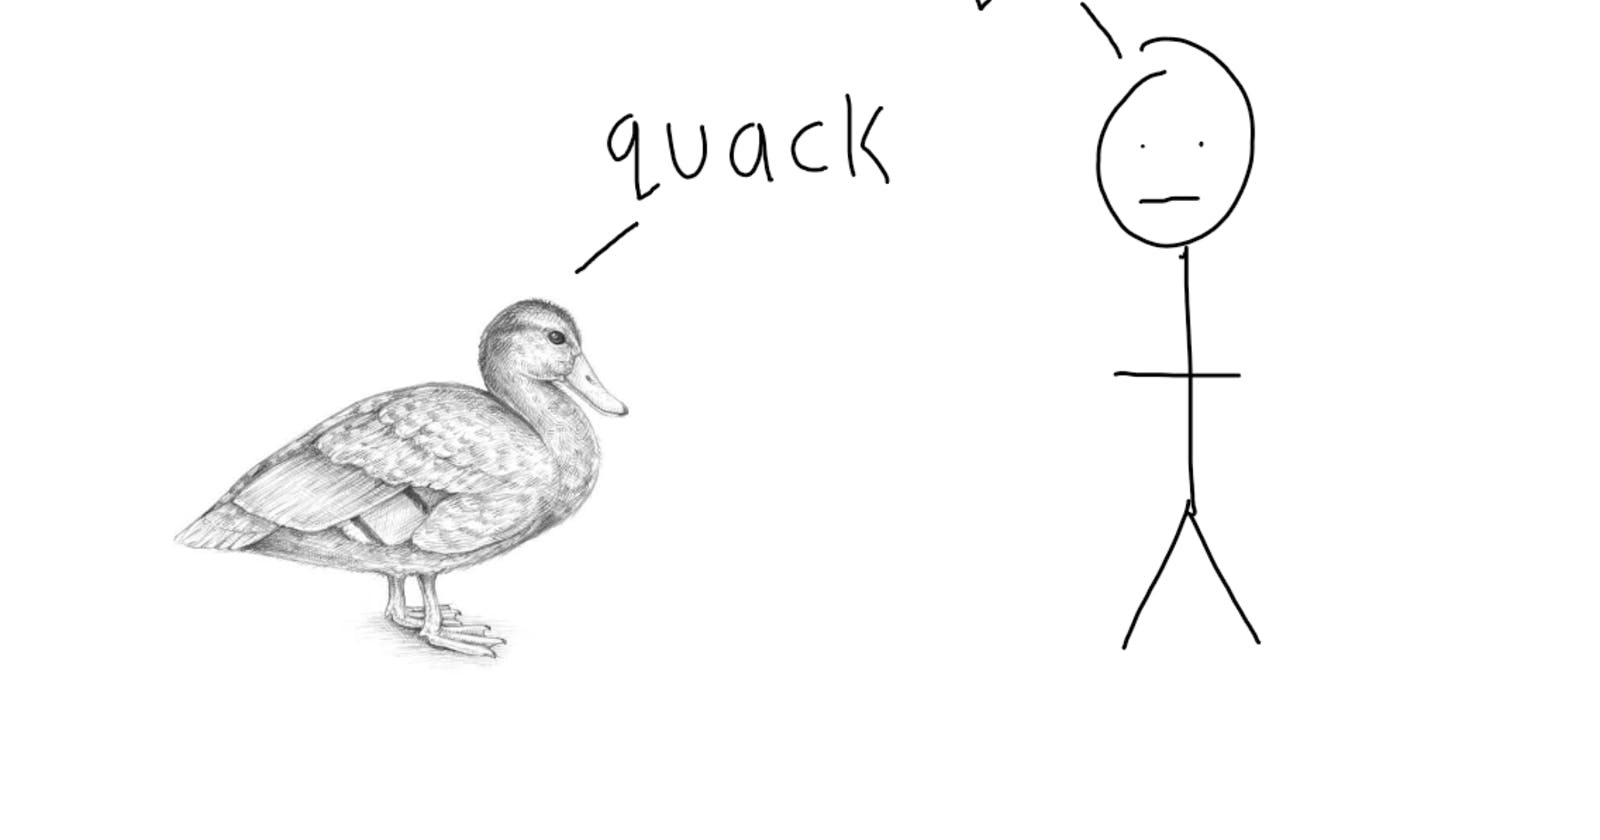
I want duck.
My Objective
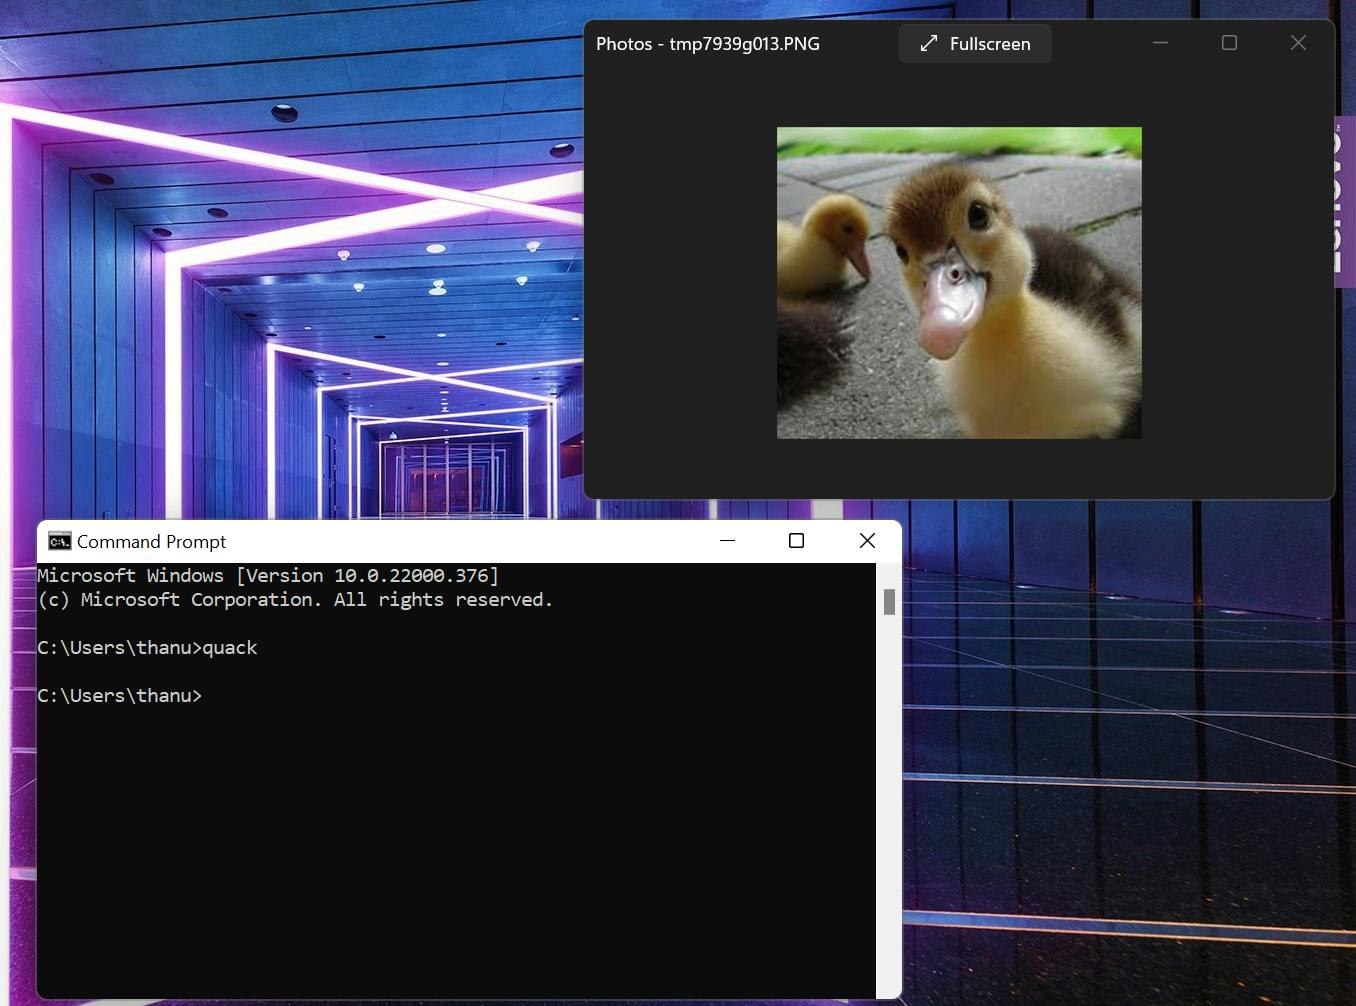
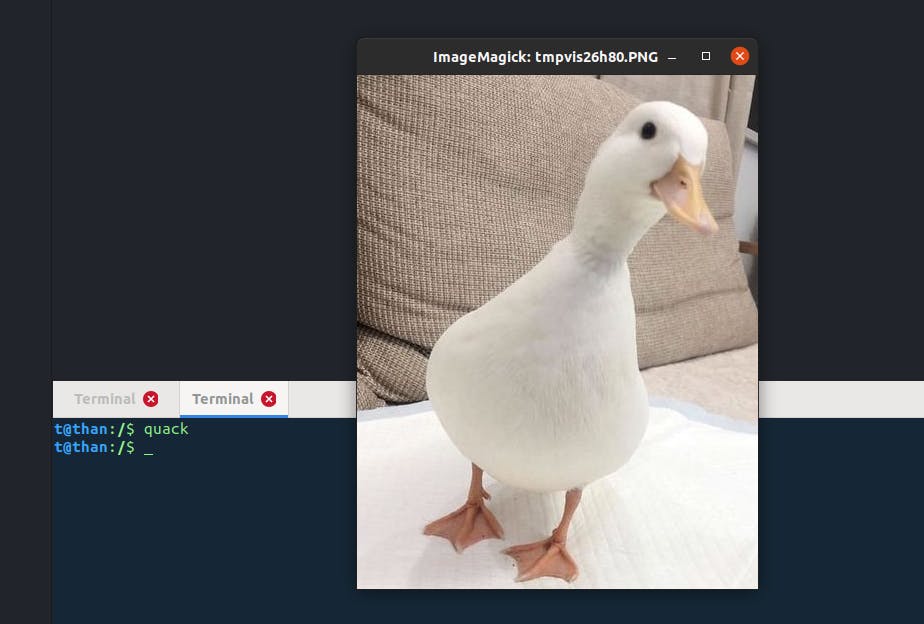
By the end of this, you will be able to get a duck picture by entering quack on your terminal.
I will be using Ubuntu for this project. However, you can also follow what I'm doing if you are on Windows.
We will be using:
- The
requestslibrary to send HTTP requests. - The PIL library to show the final image.
- The Random-d.uk API to get random duck images.
Assumptions
- You have already installed Python. Moreover for Windows users, it's one of your PATH variables.
- You have basic knowledge of using the command line.
- You understand variables and importing in Python
What I Will Cover
- Installing the needed dependencies
- Creating the needed files
- Importing dependencies
- Sending and receiving HTTP requests
- Showing the image
- Bundling the program as an executable
- Setting up the executable to be run in the terminal
- Extra steps that you can take to improve the program
Setup
Installing The Needed Dependencies
There are a few dependencies that I would like to install.
requests: A library that lets us send HTTP requests (and does a lot of the not so fun networking work behind the hood)
Pillow: A library that lets us do image processing using Python. For this tutorial, we will be using Pillow to show the final image.
NOTE: There are so many libraries that can show images. However, I chose PIL for two reasons:
1) It's lightweight. There's no need for a big boy library for something like this.
2) PIL is just... COOL. It's a great first library for image processing and a lot of the resources are catered towards first time programmers.
pyinstaller: A library that creates executable files from Python scripts.
You can install all three libraries at once using:
pip3 install requests Pillow pyinstaller
Creating The Needed Files
I highly recommend that you create a new directory just for this project. I chose to name my directory quack
This can be done in your command line with
mkdir quack
cd quack
You will only need a quack.py file for this tutorial. This is where you will do all of your work.
Create said file with however method you wish.
Your directory should look like this:
quack
├── quack.py
(you can type tree to get an outline of your directory)
Now we're ready to create our quack program.
The Code
Open your quack.py script in whatever text editor/IDE that you would like. Let's begin.
Importing Dependencies
The two libraries that you will be using for now are PIL and requests. Import what we need.
from PIL import Image
import requests
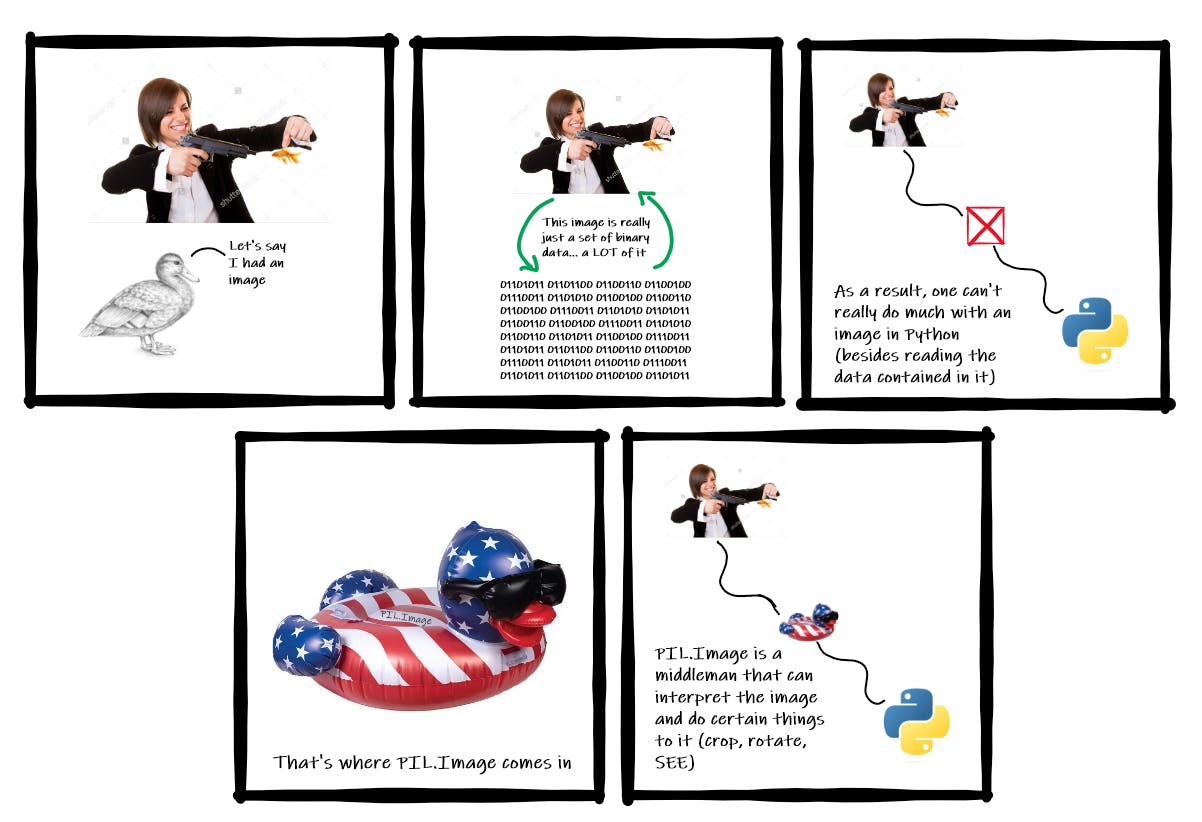
In theory, an image is just a string of data. Python doesn't directly understand images and what to do with them. Image is a module that allows us to do such a thing. You can think about it as something that helps Python interpret what an image is.
Getting A Random Image URL
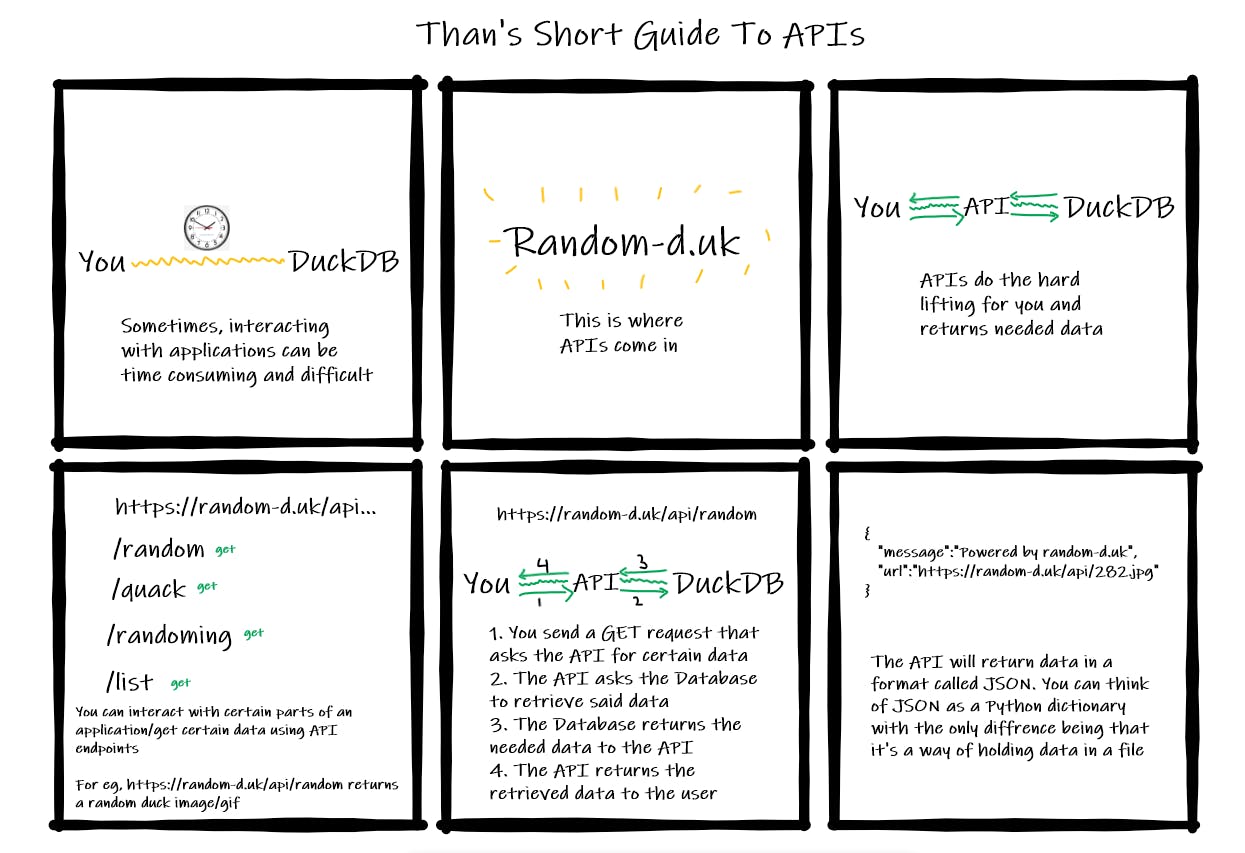
For this tutorial, we will be using the /random endpoint to retrieve the URL of a random duck image.
You can do that by creating a variable :
r = requests.get("https://random-d.uk/api/random")
r is the response that you got by sending a GET request to the URL.
At the same time, we would like to convert the response to a JSON format (in this situation, a Python dictionary).
That can be done by converting the response to JSON:
r_json = r.json()
Something to note is that the endpoint returns a JSON object that looks something along the lines of:
{
      "message": "Powered by random-d.uk",
      "url": "some_url"
}
All we need is the url. We can retrieve that key by declaring another variable that grabs said key from the response JSON.
quack = r_json["url"]
At the moment, your program should look something along the lines of:
from PIL import Image
import requests

r = requests.get("https://random-d.uk/api/random")
r_json = r.json()

quack = r_json["url"]
Now, we need to get the image from the URL
Get The Duck Image
If you recall, I mentioned that an image is just a set of binary data. At the same time, PIL.Image is able to take image binary data and make it manageable by Python.
All that we need to do is get said raw data from the URL.
First, we will send another GET request using the quack variable
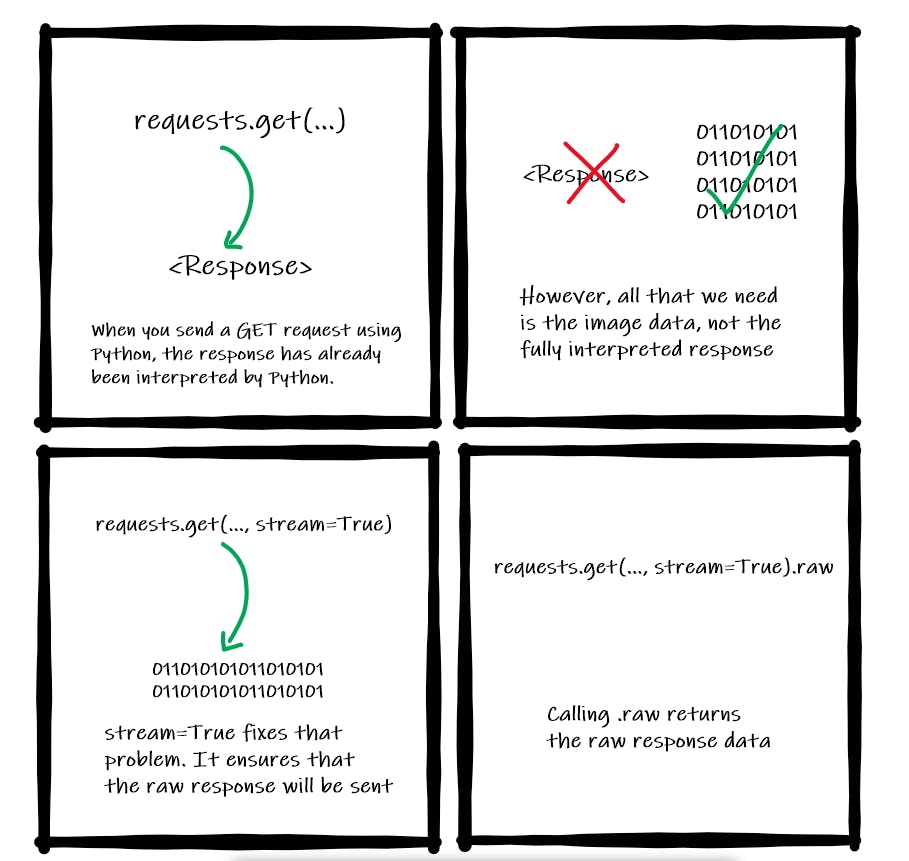
r2 = requests.get(quack, stream=True)
You will notice something different. More specifically, the stream=True. What... IS that you may ask?
In short, when you call requests.get, Python automatically interprets the response. However, all that we need is the image data.
stream=True ensures that the final response is the raw data.
You can then save said data by calling .raw to another variable
r2_raw = r2.raw
By now, your program should look something along the lines of:
from PIL import Image
import requests

r = requests.get("https://random-d.uk/api/random")
r_json = r.json()

quack = r_json["url"]

r2 = requests.get(quack, stream=True)
r2_raw = r2.raw
The final step is to utilize PIL.Image to interpret and show the image data.
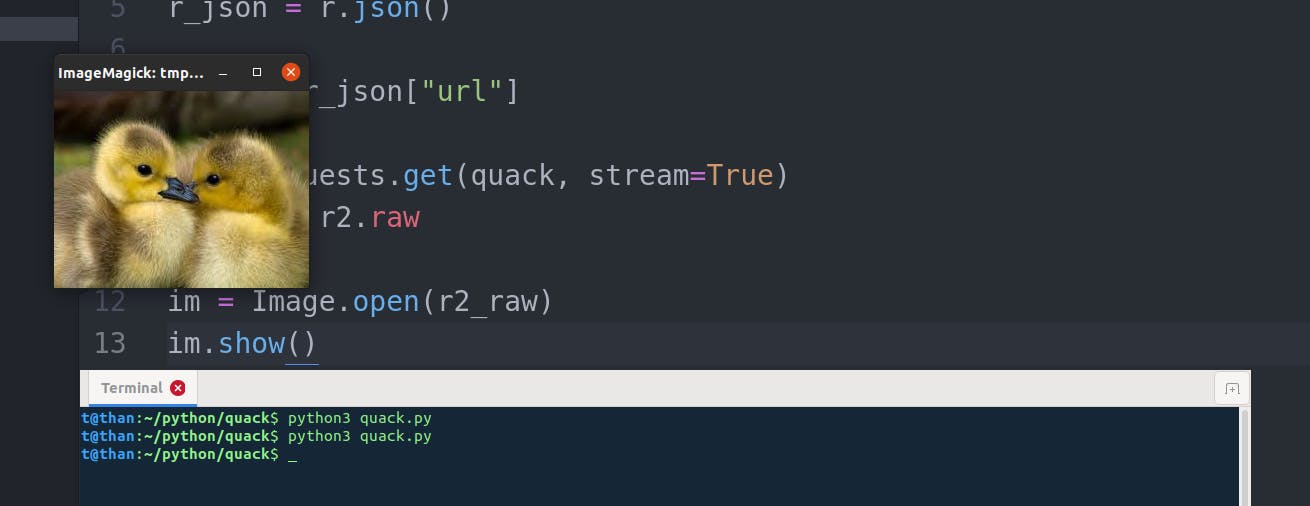
Showing The Image
We will declare one final variable:
im = Image.open(r2_raw)
im is an instance of PIL.Image that interpreted the raw data.
At the same time, im allows you to show the image. That is done by calling
im.show()
The Final Code
Your program should look like the following
from PIL import Image
import requests

r = requests.get("https://random-d.uk/api/random")
r_json = r.json()

quack = r_json["url"]

r2 = requests.get(quack, stream=True)
r2_raw = r2.raw

im = Image.open(r2_raw)
im.show()
if you run the program, you will notice that a duck image will appear.
Configuring The quack Command
One problem with our current implementation is that we aren't able to run quack as a command.
If you try, the command isn't recognized by the terminal.
We can solve this with two simple steps
- Create an executable (.exe files for windows users) from the program using
pyinstaller - This step varies on operating system. If you are on Windows, you add the .exe as a PATH variable and resetting your PC. If you are on Ubuntu, you add a new alias to
~/.bashrcand resetting the terminal.
Creating The Executable
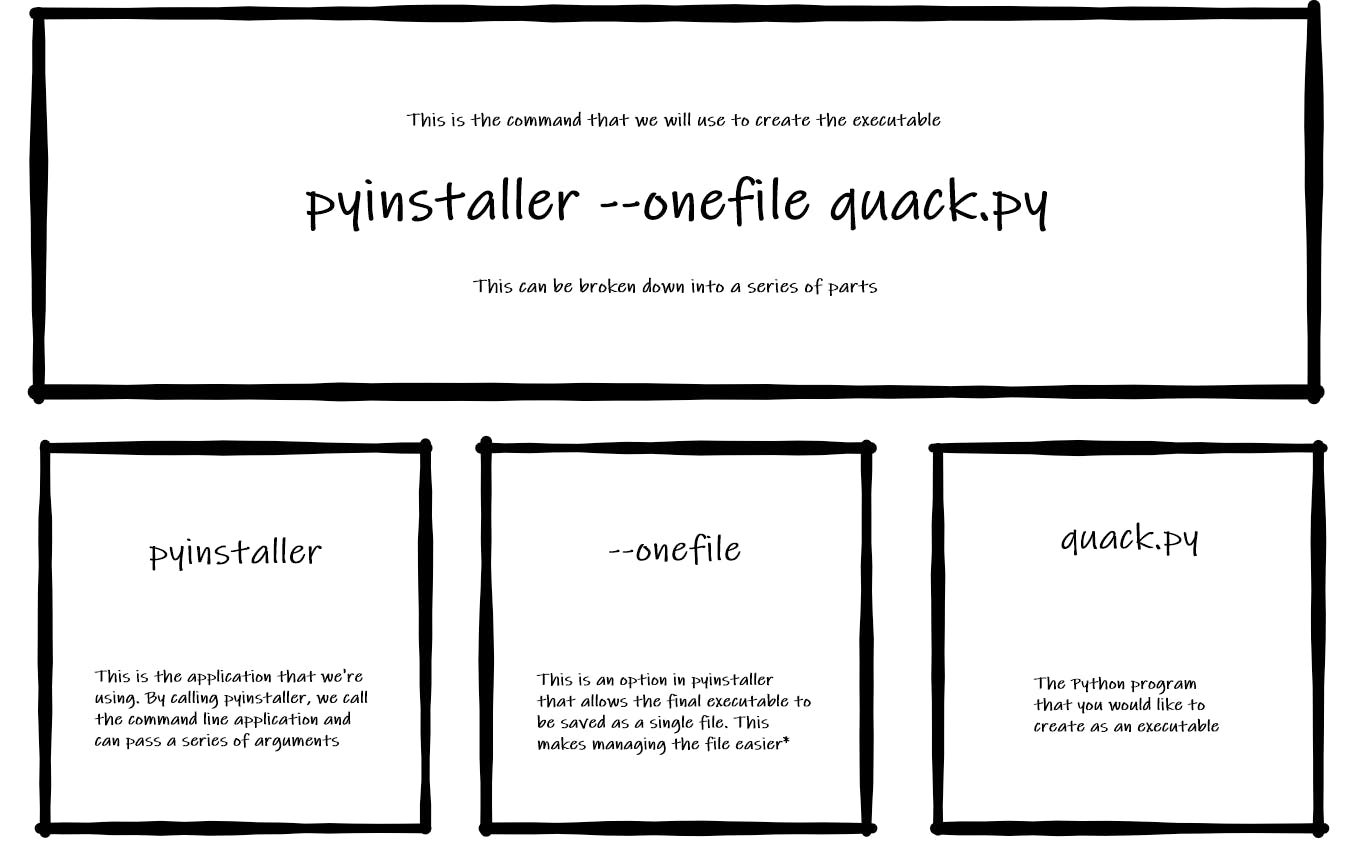
Remember when we installed pyinstaller? Here is where we make use of it.
On the command line, make sure that you're in the directory where quack.py is saved.
Type in the following command
pyinstaller --onefile quack.py
After about a minute or two, you will see three new things.
- build: Files that assist in creating the executable.
- dist: The final executable.
- quack.spec: Specific settings that are applied when the executable is created.
Your directory should look something along the lines of:
.
├── quack.py
├── build
├── dist
    ├── quack (or quack.exe if you're on Windows)
├── quack.spec
You can also declutter your project by removing unneeded files.
- Remove the
builddirectory and all it's contents.
.
├── quack.py
├── dist
    ├── quack/quack.exe
├── quack.spec
- Move
quack/quack.exeout ofdistand into the main project directory.
.
├── quack.py
├── dist
├── quack/quack.exe
├── quack.spec
- You are free to remove the
distdirectory.
.
├── quack.py
├── quack/quack.exe
├── quack.spec
- You can also remove
quack.spec
.
├── quack.py
├── quack/quack.exe
By now, you should only have two files: the python program (quack.py) and the executable (quack or quack.exe).
Quackifying The Command Line
The final step is to configure the executable to be accessible by the command line. This step varies by operating system. If you are using a system besides Windows and Ubuntu, feel free to research the desired method.
An appropriate prompt to Google is adding executable to path [operating system]
Windows
You need to copy the full path of quack.exe. One way of doing this is to
Open the File Explorer and navigate to the project folder
Right click the .exe file and click "properties"
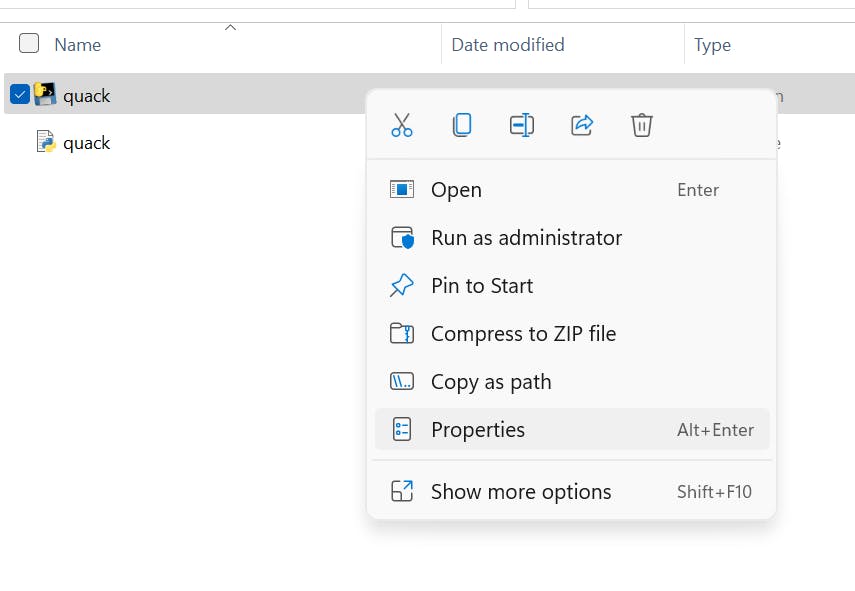
Copy the "Location" property
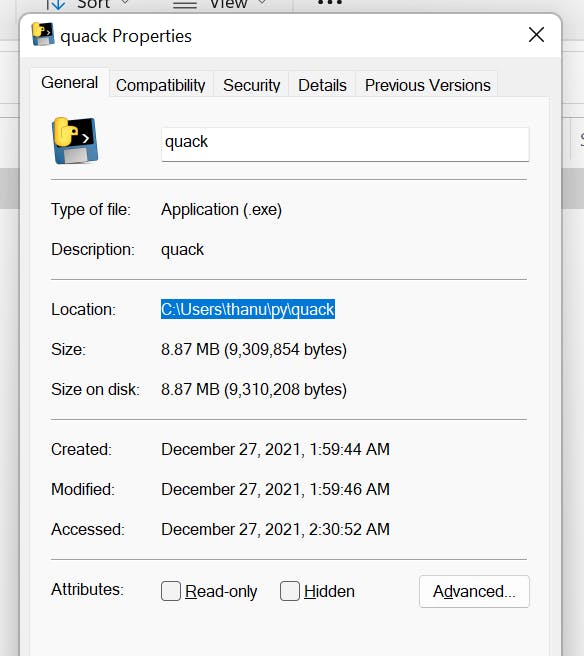
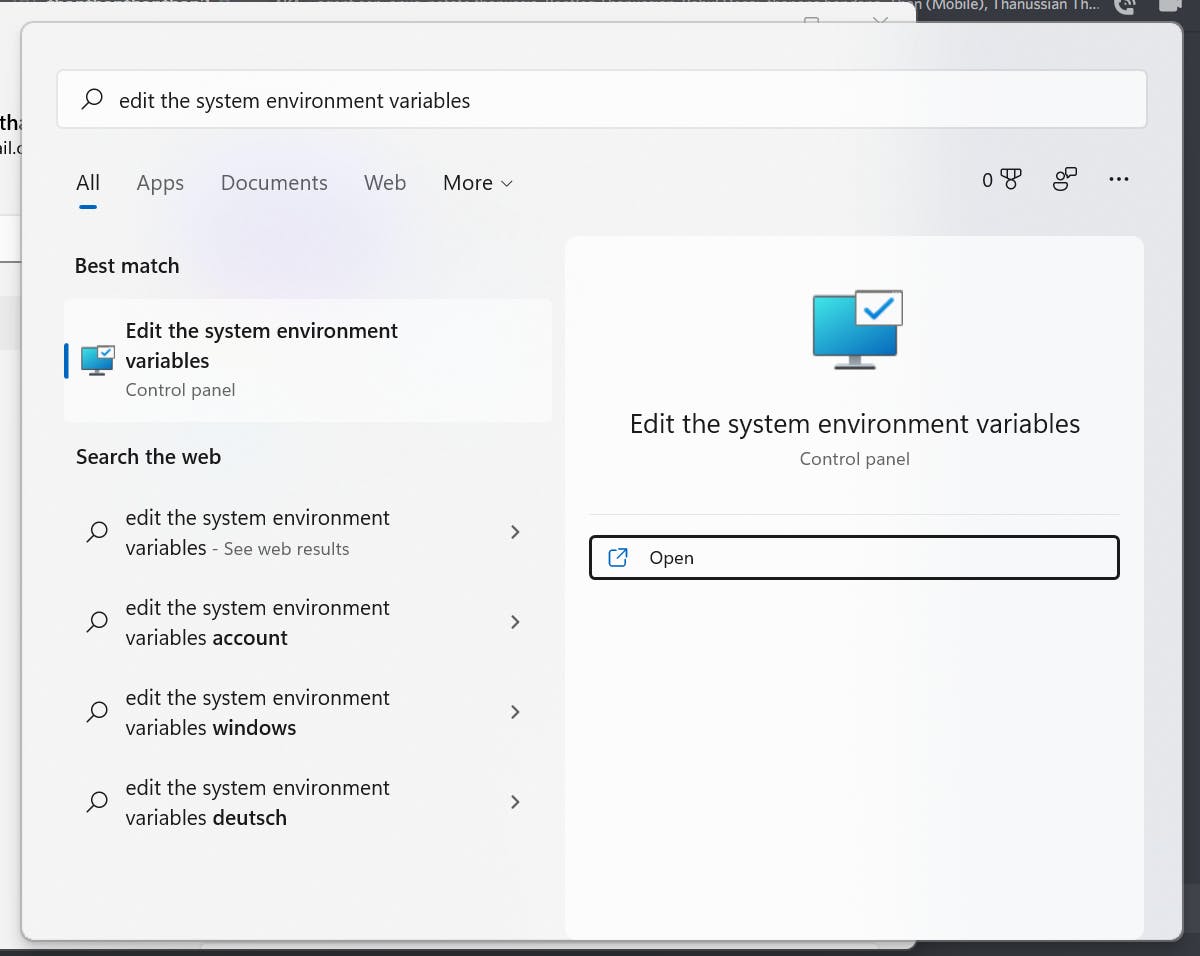
Search "Edit the system environment variables" and click the first result
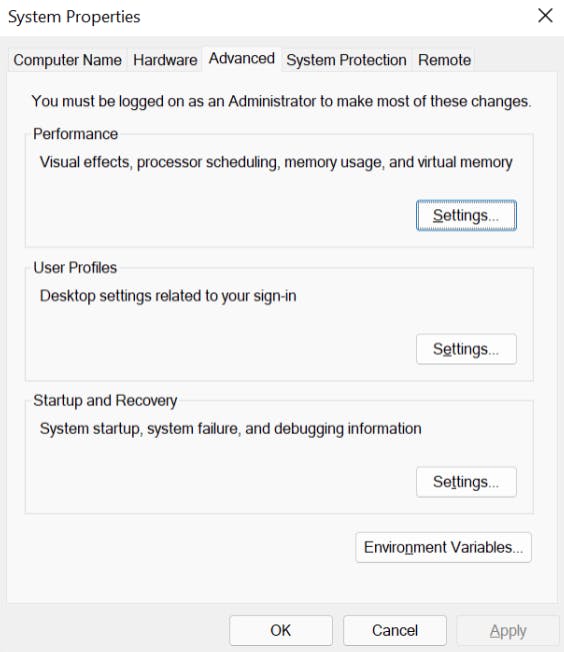
Click "Environment Variables..."
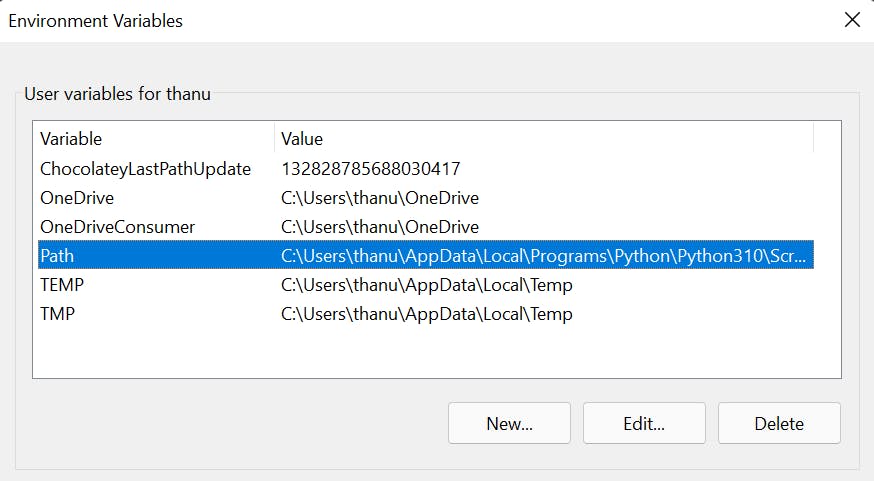
Double click "Path"
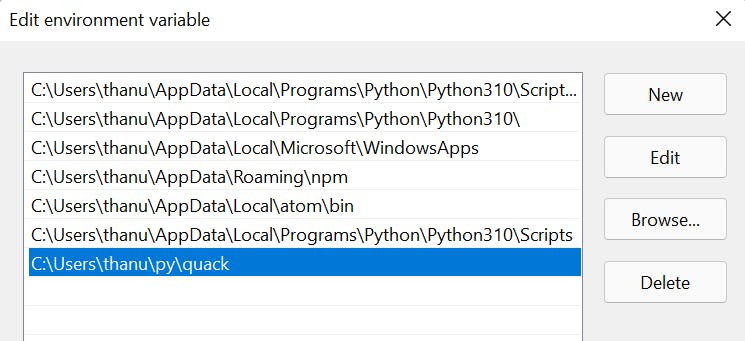
Click "New" and paste in the file-path that you copied
Click "Ok" until you've exited out of the settings page.
Finally, open a new terminal and type quack to test if it works.
Ubuntu
You will need to copy the full file path of quack. Assuming you have a terminal with the project directory open, this can be done with two steps.
- Enter
pwdand copy the path. - Add
/quackto the end of said path
In my situation. I get /home/t/python/quack when I enter pwd. The final result is /home/t/python/quack/quack. I copied that to my clipboard.
Once you do that, find a way to open ~/.bashrc in a text editor.
Personally, I entered gedit ~/.bashrc in the terminal.
At the bottom of the program, enter the following:
# Quack program
alias quack=[the final path that you copied]
Note that while it isn't necessary to add the comment, it's just nice to have long term in case you forget. Moreover, it creates a sense of separation between the other configuration settings.
Save and exit the file.
On your terminal, you can enter source ~/.bashrc to apply the changes.
Type quack to test if it works.
You've Done It!
You have reached the end of this tutorial. Well done!!
Where To Find Me
You can find more of my work through Linkedin, GitHub and my personal site.